Continuous Monitoring (ConMon)
Operations guide for the Continuous Monitoring module in the GRC-ITSM platform, covering monthly vulnerability review, deviation requests, alert response, and SLA tracking.
Overview
Each month, vulnerability scan results flow into the GRC-ITSM platform from Huntress and Microsoft Defender for Endpoint across the organization's CMMC enclave. The ConMon team reviews findings, determines which are false positives and which are genuine issues, creates deviation requests for false positives, and escalates real vulnerabilities for remediation. Security alerts also arrive in real time when Defender detects suspicious activity, and these have tight SLA windows and require fast response.
ConMon Sidebar Navigation
The ConMon module is accessed from the left sidebar. Key sections:
| Section | What It Contains |
|---|---|
| Issues > All Open Issues | All current unresolved vulnerability findings |
| Alerts and Incidents > Open Alerts | Real-time security alerts requiring response |
| Tasks > ConMon Tasks | Recurring scheduled tasks |
| Deviations > All Deviations | All deviation requests (FP, risk adjustment) |
| Deviations > Pending Deviations | Deviations awaiting approval |
Monthly Vulnerability Review
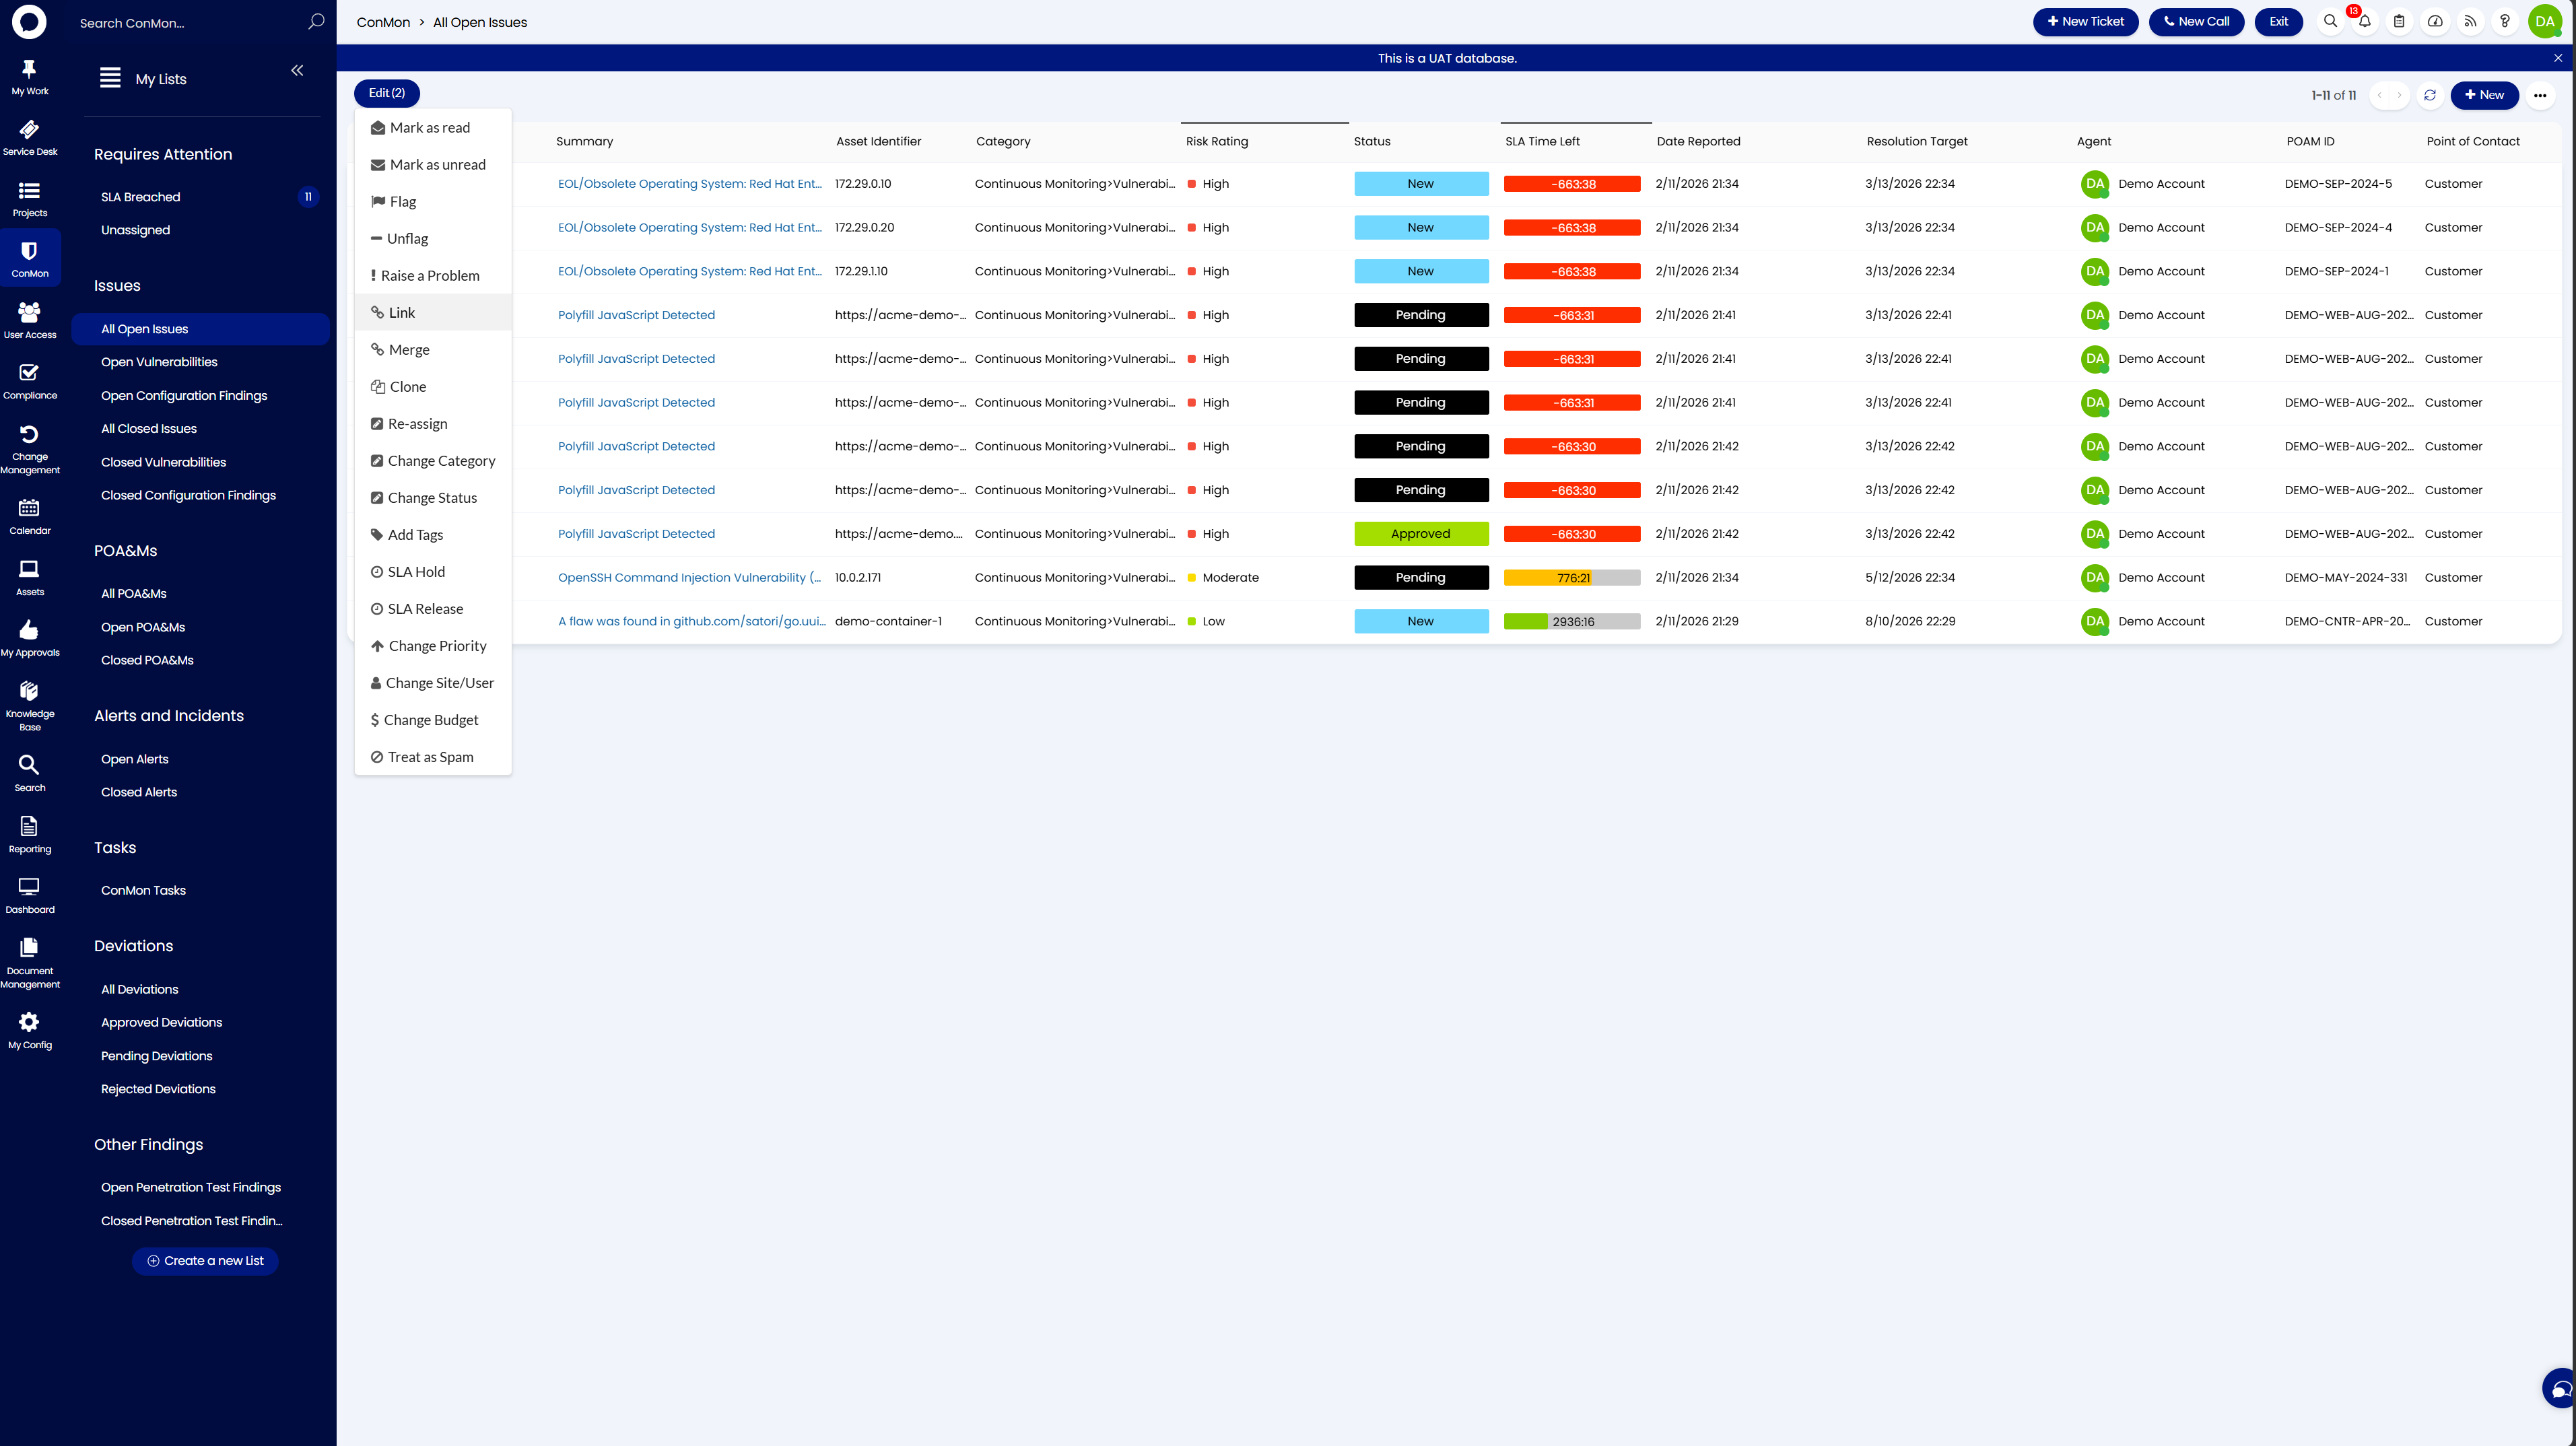
Navigate to ConMon > Issues > All Open Issues to see all current findings.
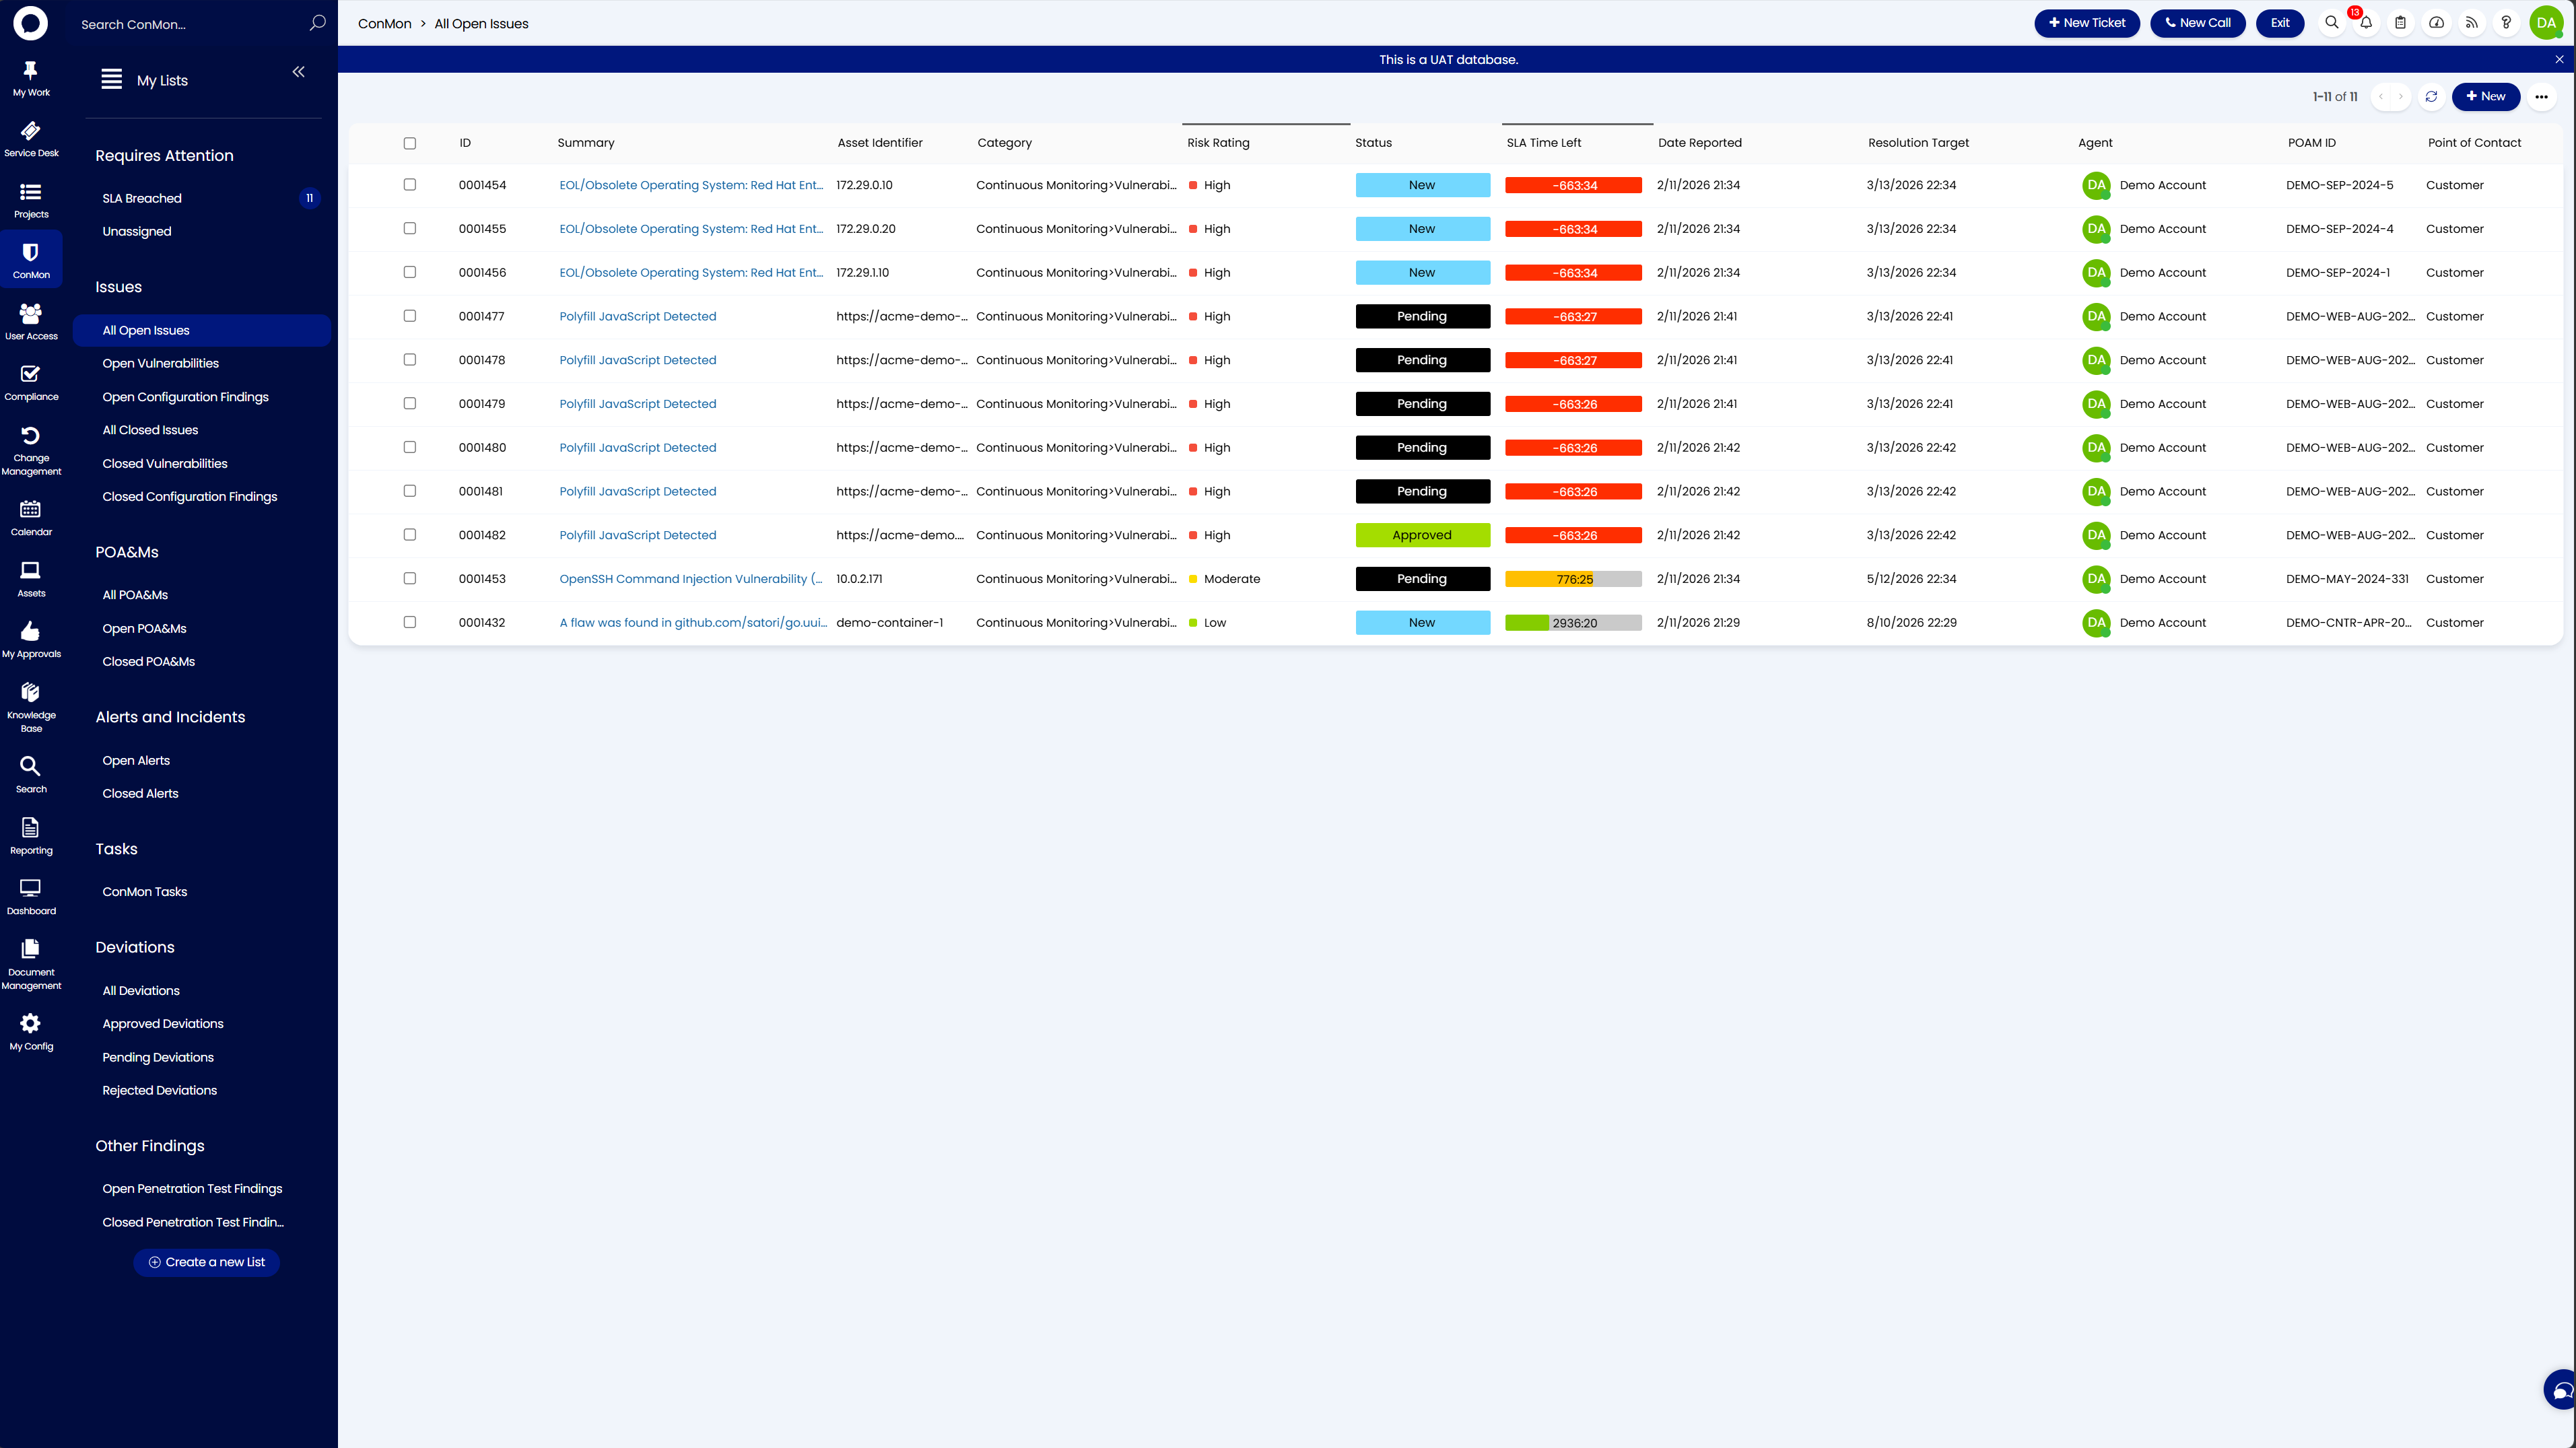
The All Open Issues view displays vulnerability findings with risk ratings, SLA timers, and statuses. Each row is a single finding with the following key columns:
| Column | Description |
|---|---|
| ID | POAM identifier |
| Summary | Description or CVE of the finding |
| Asset Identifier | Affected IP, hostname, or URL |
| Category | Finding classification (e.g., Continuous Monitoring > Vulnerability) |
| Risk Rating | Critical, High, Moderate, or Low |
| Status | New, Pending, Approved, or Overdue |
| SLA Time Left | Remaining time before remediation SLA expires. Green = on track, red/negative = breached |
| POAM ID | The linked POAM reference |
| Point of Contact | Organizational contact |
Work through the list reading each finding to determine whether it is a false positive or a real issue that needs remediation.
Triaging Findings
Click any finding to open its detail view.
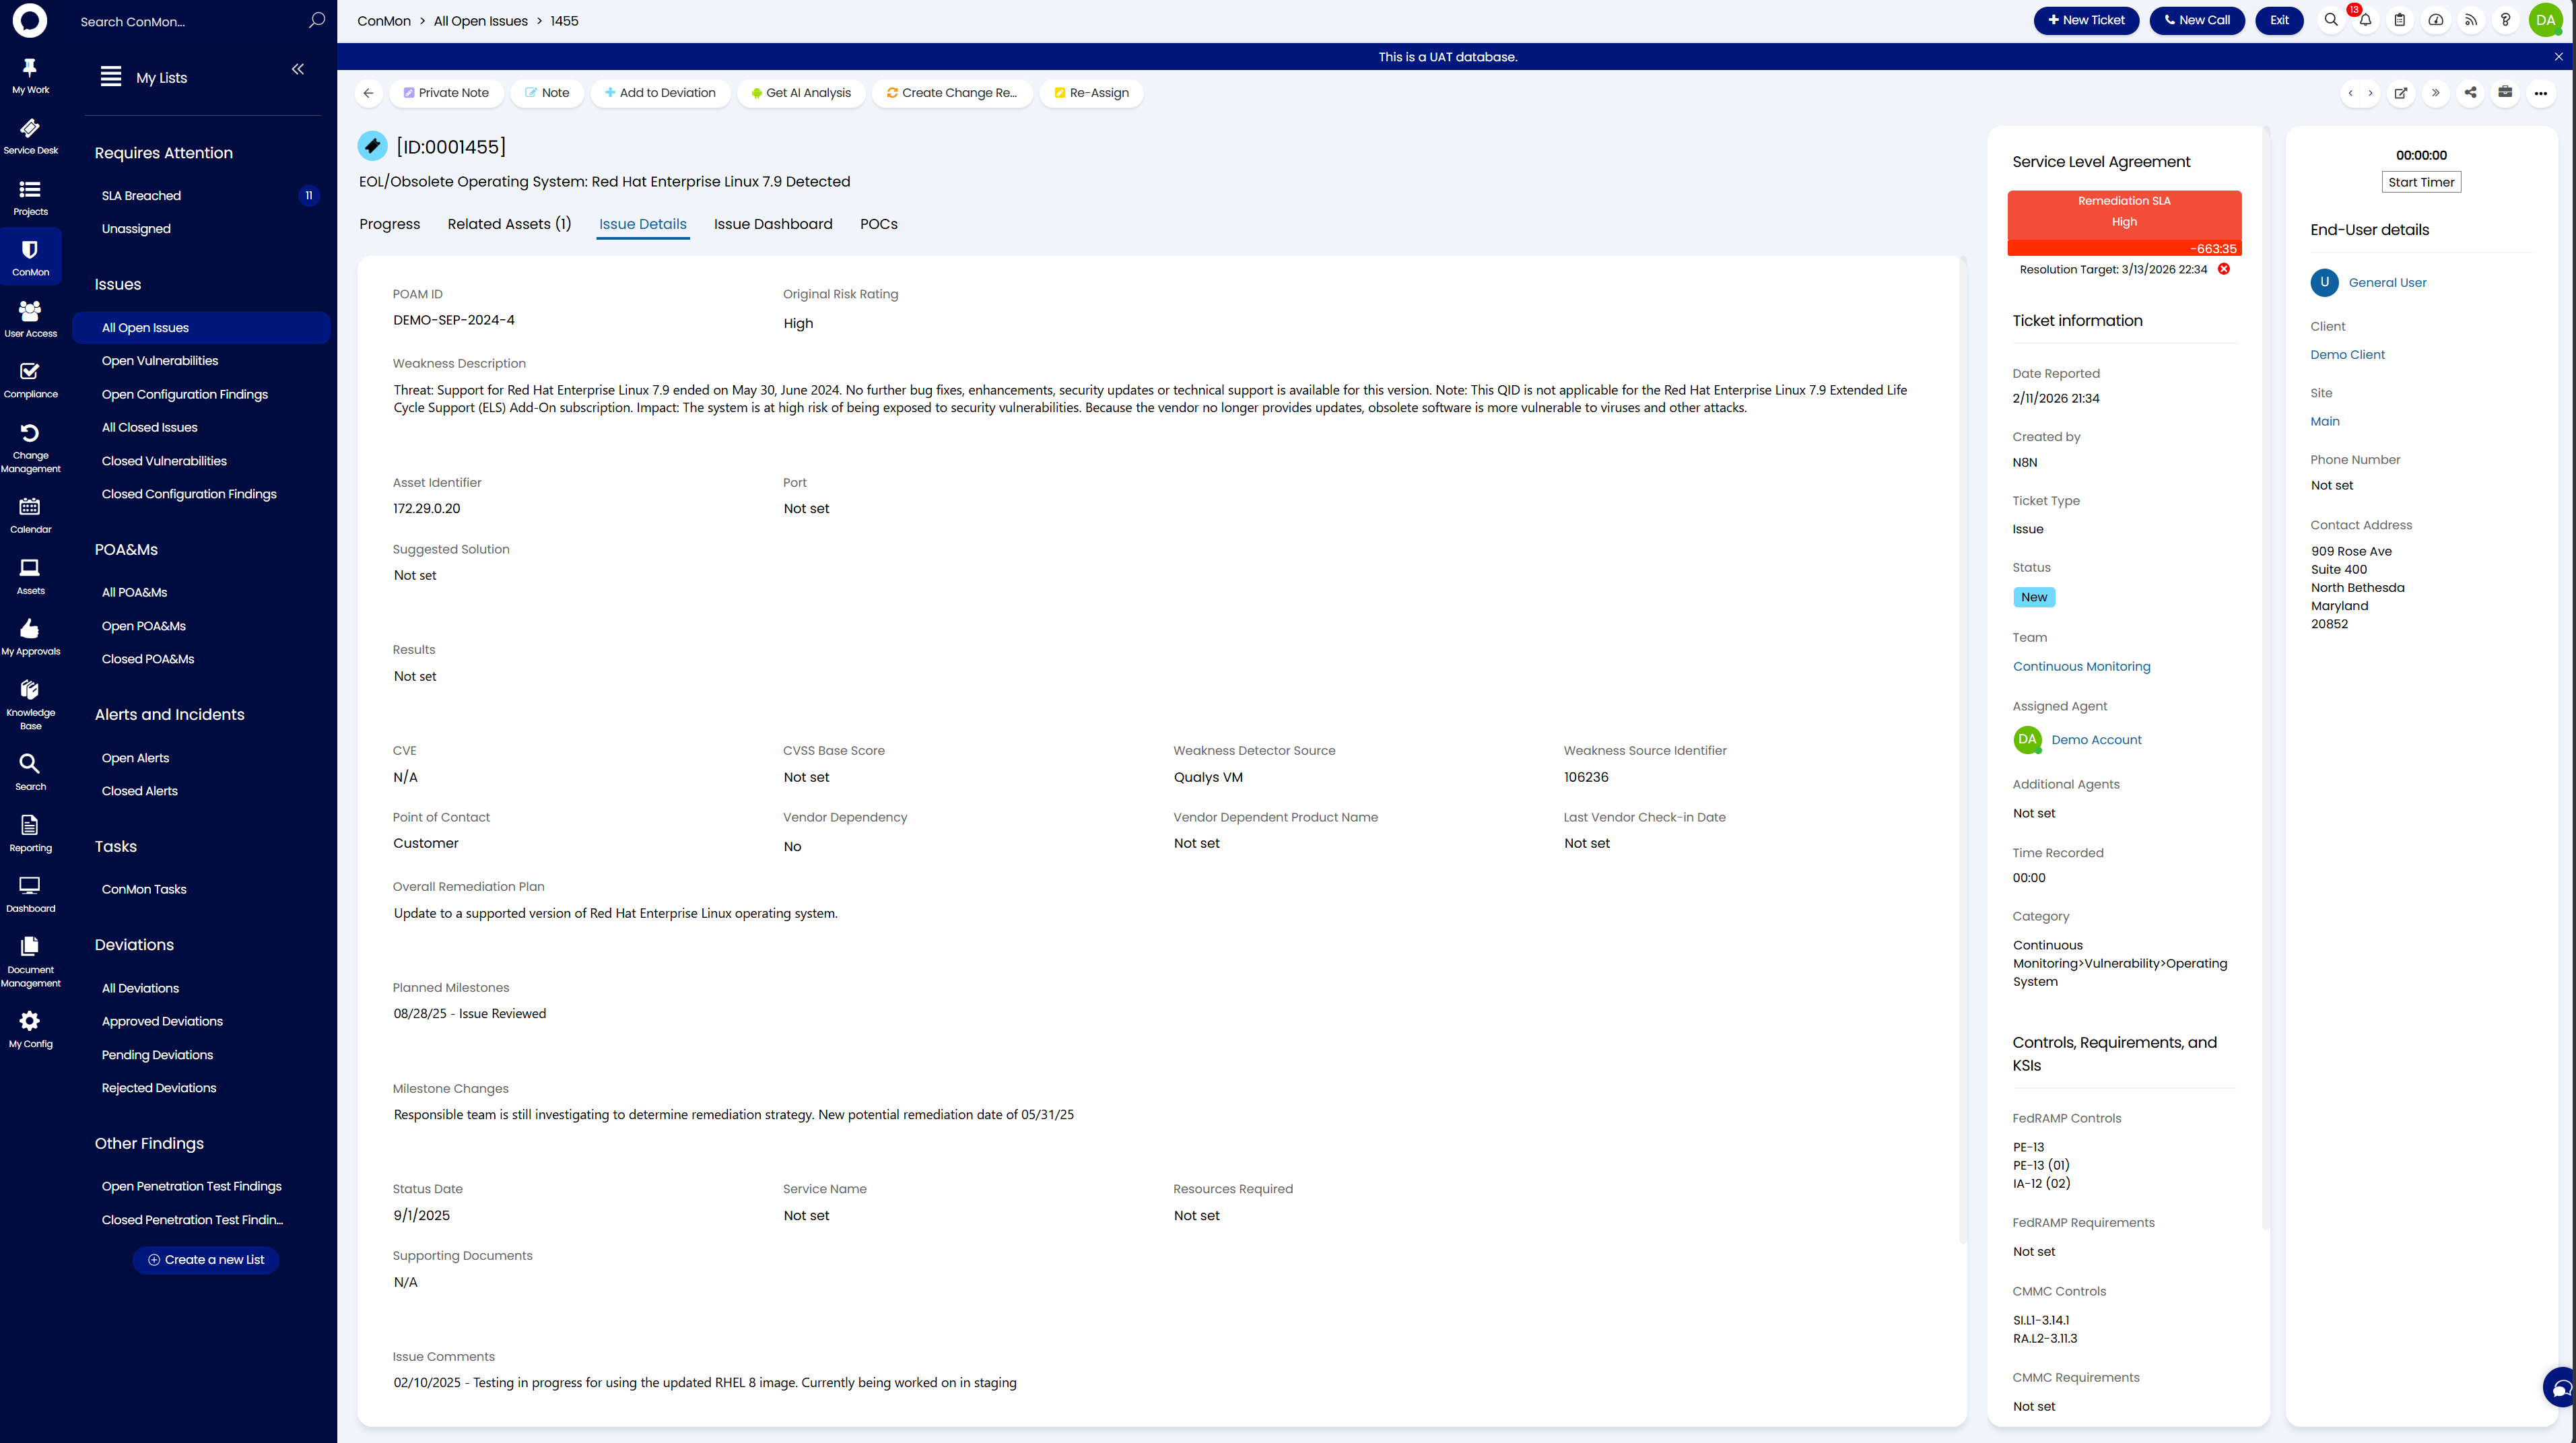
The detail view shows the summary at the top, with tabs for Progress, Related Assets, Issue Details, Issue Dashboard, and POCs. The right panel shows the SLA timer, organization, site, assigned agent, team, category, and mapped Controls, Requirements, and KSIs (including FedRAMP and CMMC control mappings).
The toolbar at the top provides action buttons including Add to Deviation, Note, Private Note, Get AI Analysis, Create Change Request, and Re-Assign.
Triage Decision
For each finding, decide:
- False positive - The vulnerability is not exploitable in this environment (e.g., FIPS configured, component out of scope, mitigating controls in place). Create a deviation request.
- Real issue - The vulnerability is present and exploitable. Escalate for remediation.
- Risk adjustment - The vulnerability is real but is lower risk based on operational setup. Create a deviation request with justification.
Creating a Vulnerability Deviation Request
When a finding is a false positive, create a Vulnerability Deviation for each POAM ID.
Step 1: Create a New Deviation Ticket
Navigate to ConMon > Deviations > All Deviations and click + New Ticket in the top right corner. This opens the new deviation form.
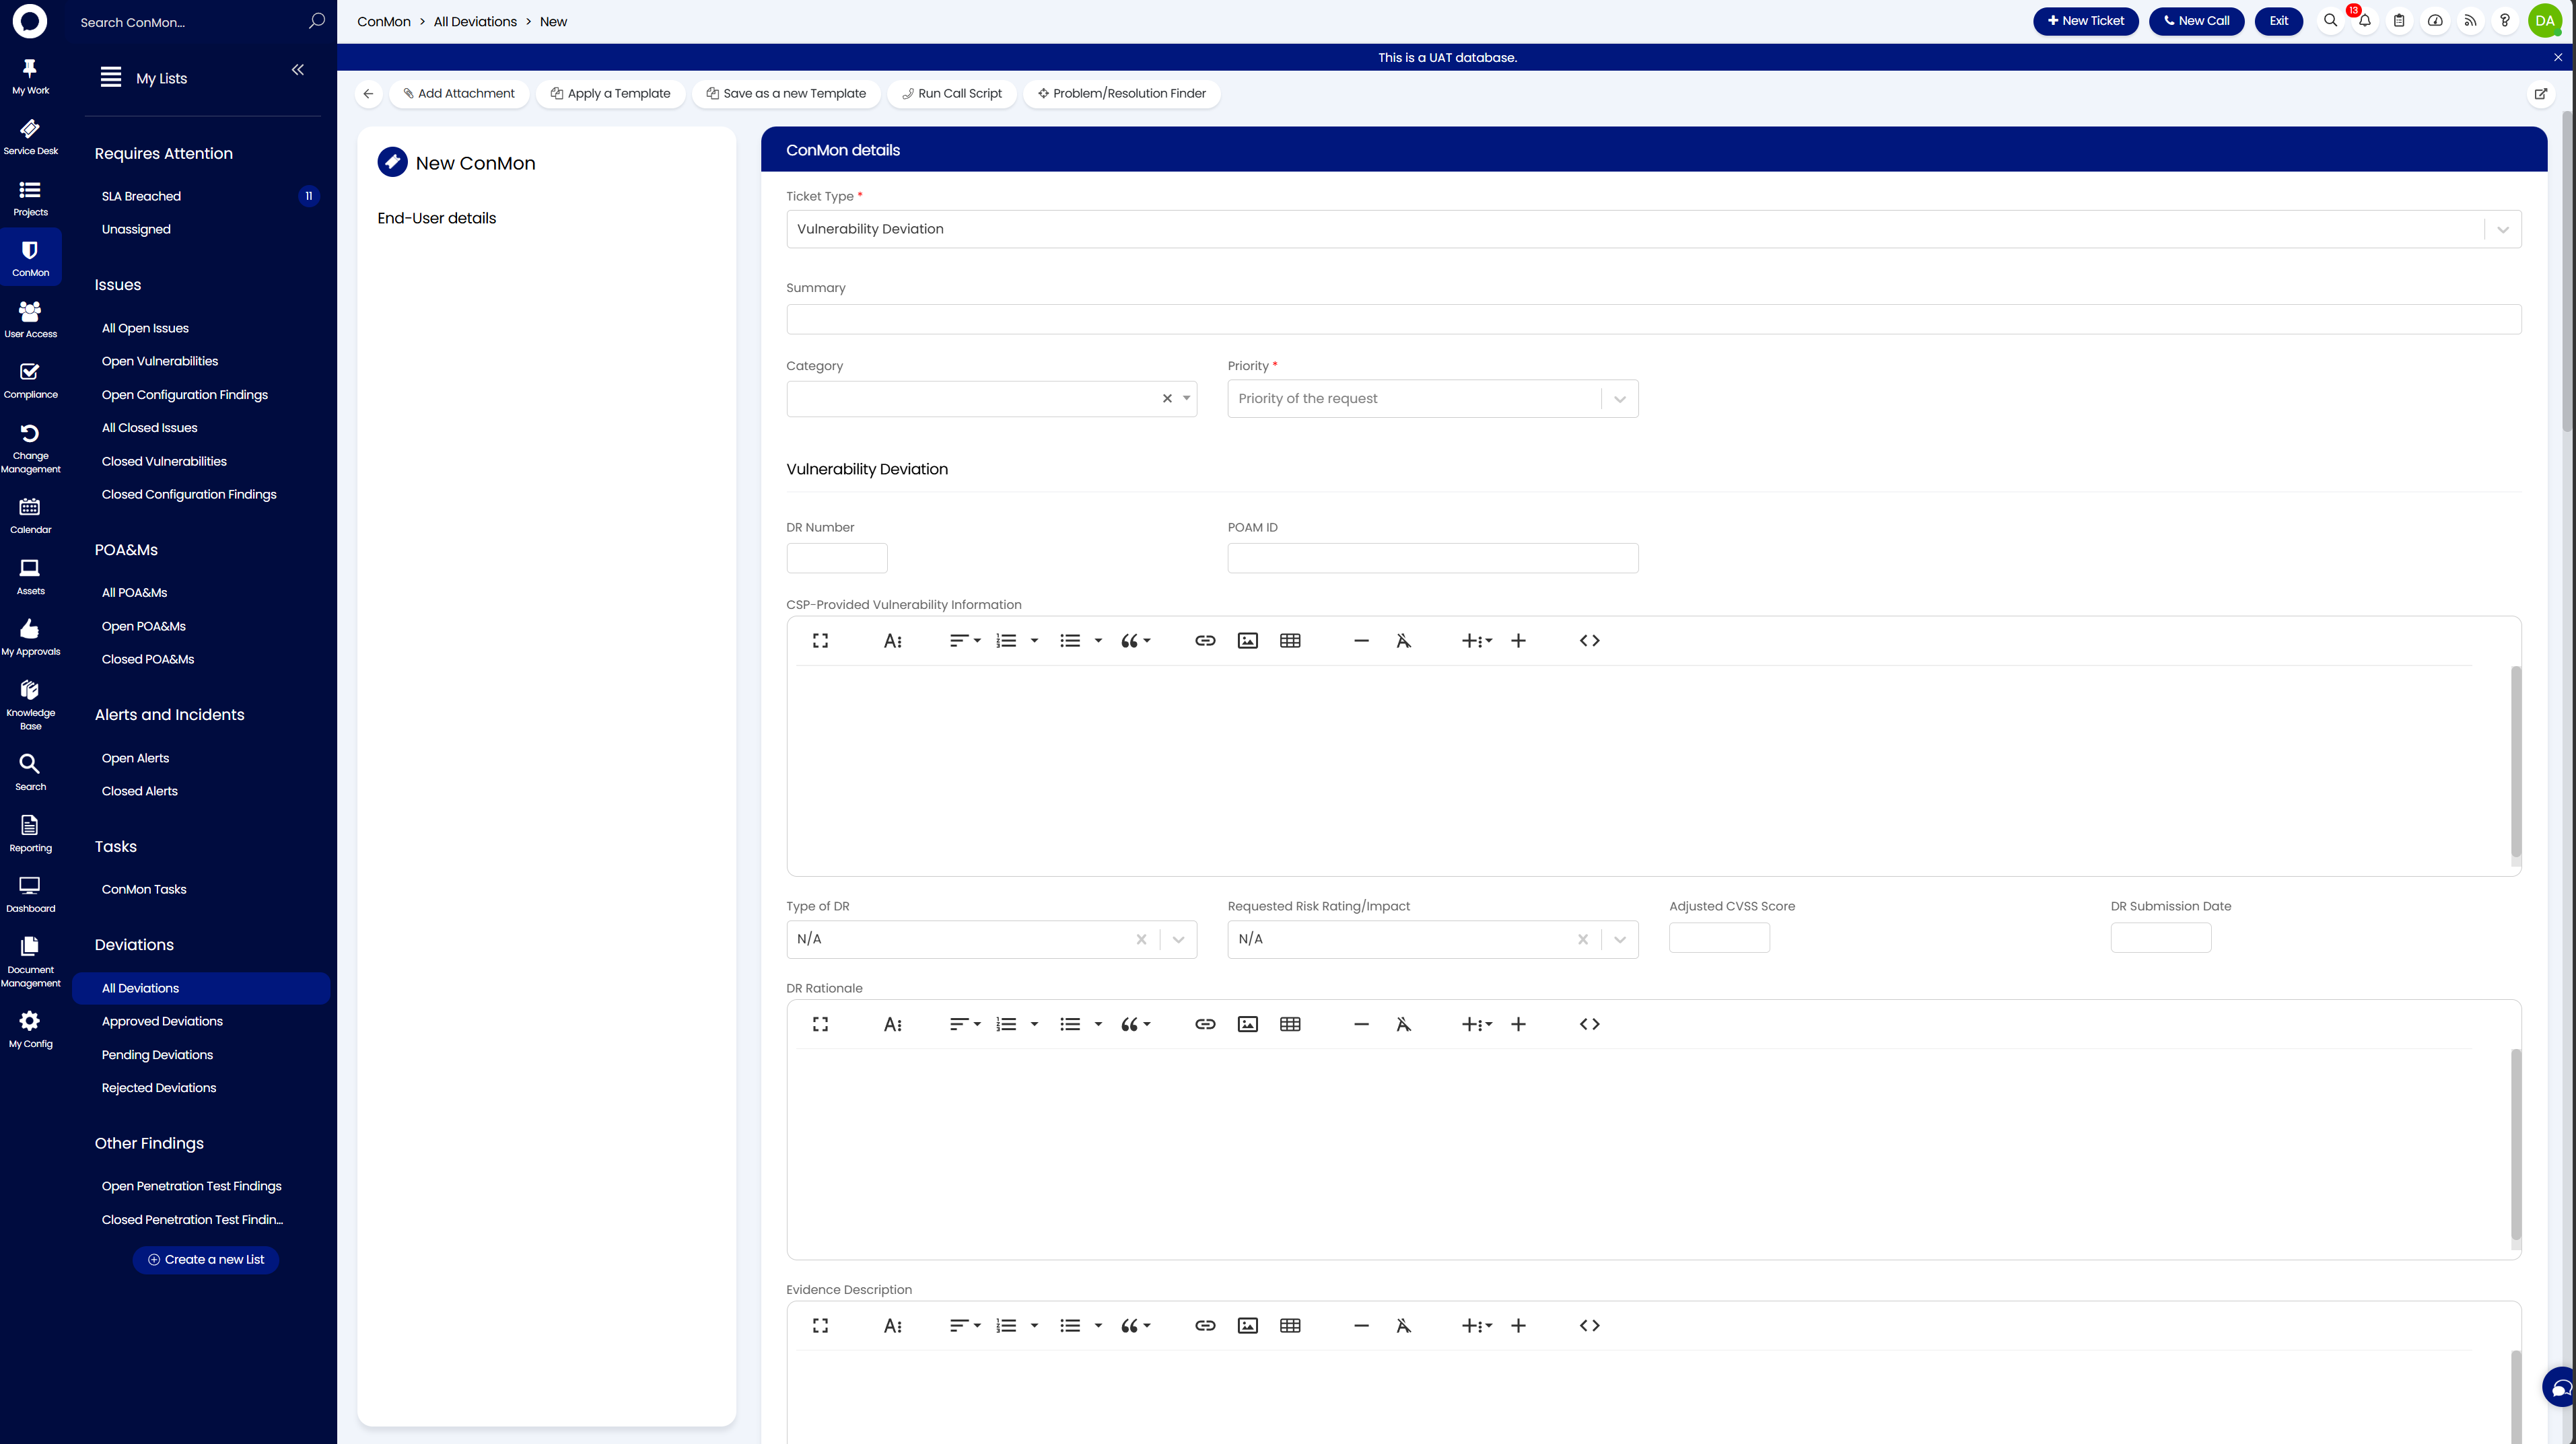
Complete the following fields:
ConMon Details (top section)
| Field | What to Enter |
|---|---|
| Ticket Type | Vulnerability Deviation |
| Summary | The CVE or vulnerability name (e.g., "OpenSSH Command Injection Vulnerability (Generic)") |
| Category | Select the appropriate category |
| Priority | Match the original finding's risk rating |
Vulnerability Deviation (middle section)
| Field | What to Enter |
|---|---|
| DR Number | Leave blank if auto-assigned, or enter the next sequential DR number |
| POAM ID | The POAM ID from the original finding (e.g., DEMO-MARCH-2023-32) |
| CSP-Provided Vulnerability Information | Paste the full vulnerability description from the finding. Include threat details, affected versions, and detection logic |
| Type of DR | FP for false positive, or OR RA for operational requirement / risk adjustment |
| Requested Risk Rating/Impact | N/A for false positives |
| Adjusted CVSS Score | Leave blank for FPs |
| DR Submission Date | Today's date |
Justification (lower section)
| Field | What to Enter |
|---|---|
| DR Rationale | Technical justification for the FP. Be specific about mitigating controls, boundary isolation, vendor statements, etc. |
| Evidence Description | What evidence supports the determination (e.g., Intune configuration, Firewall ACL export, Vendor EOL advisory) |
| List of Evidence Attachments | Attach supporting files (screenshots, config exports, vendor advisories) |
| Operational Impact Statement | If applicable, describe any operational impact |
Save the ticket once all fields are complete.
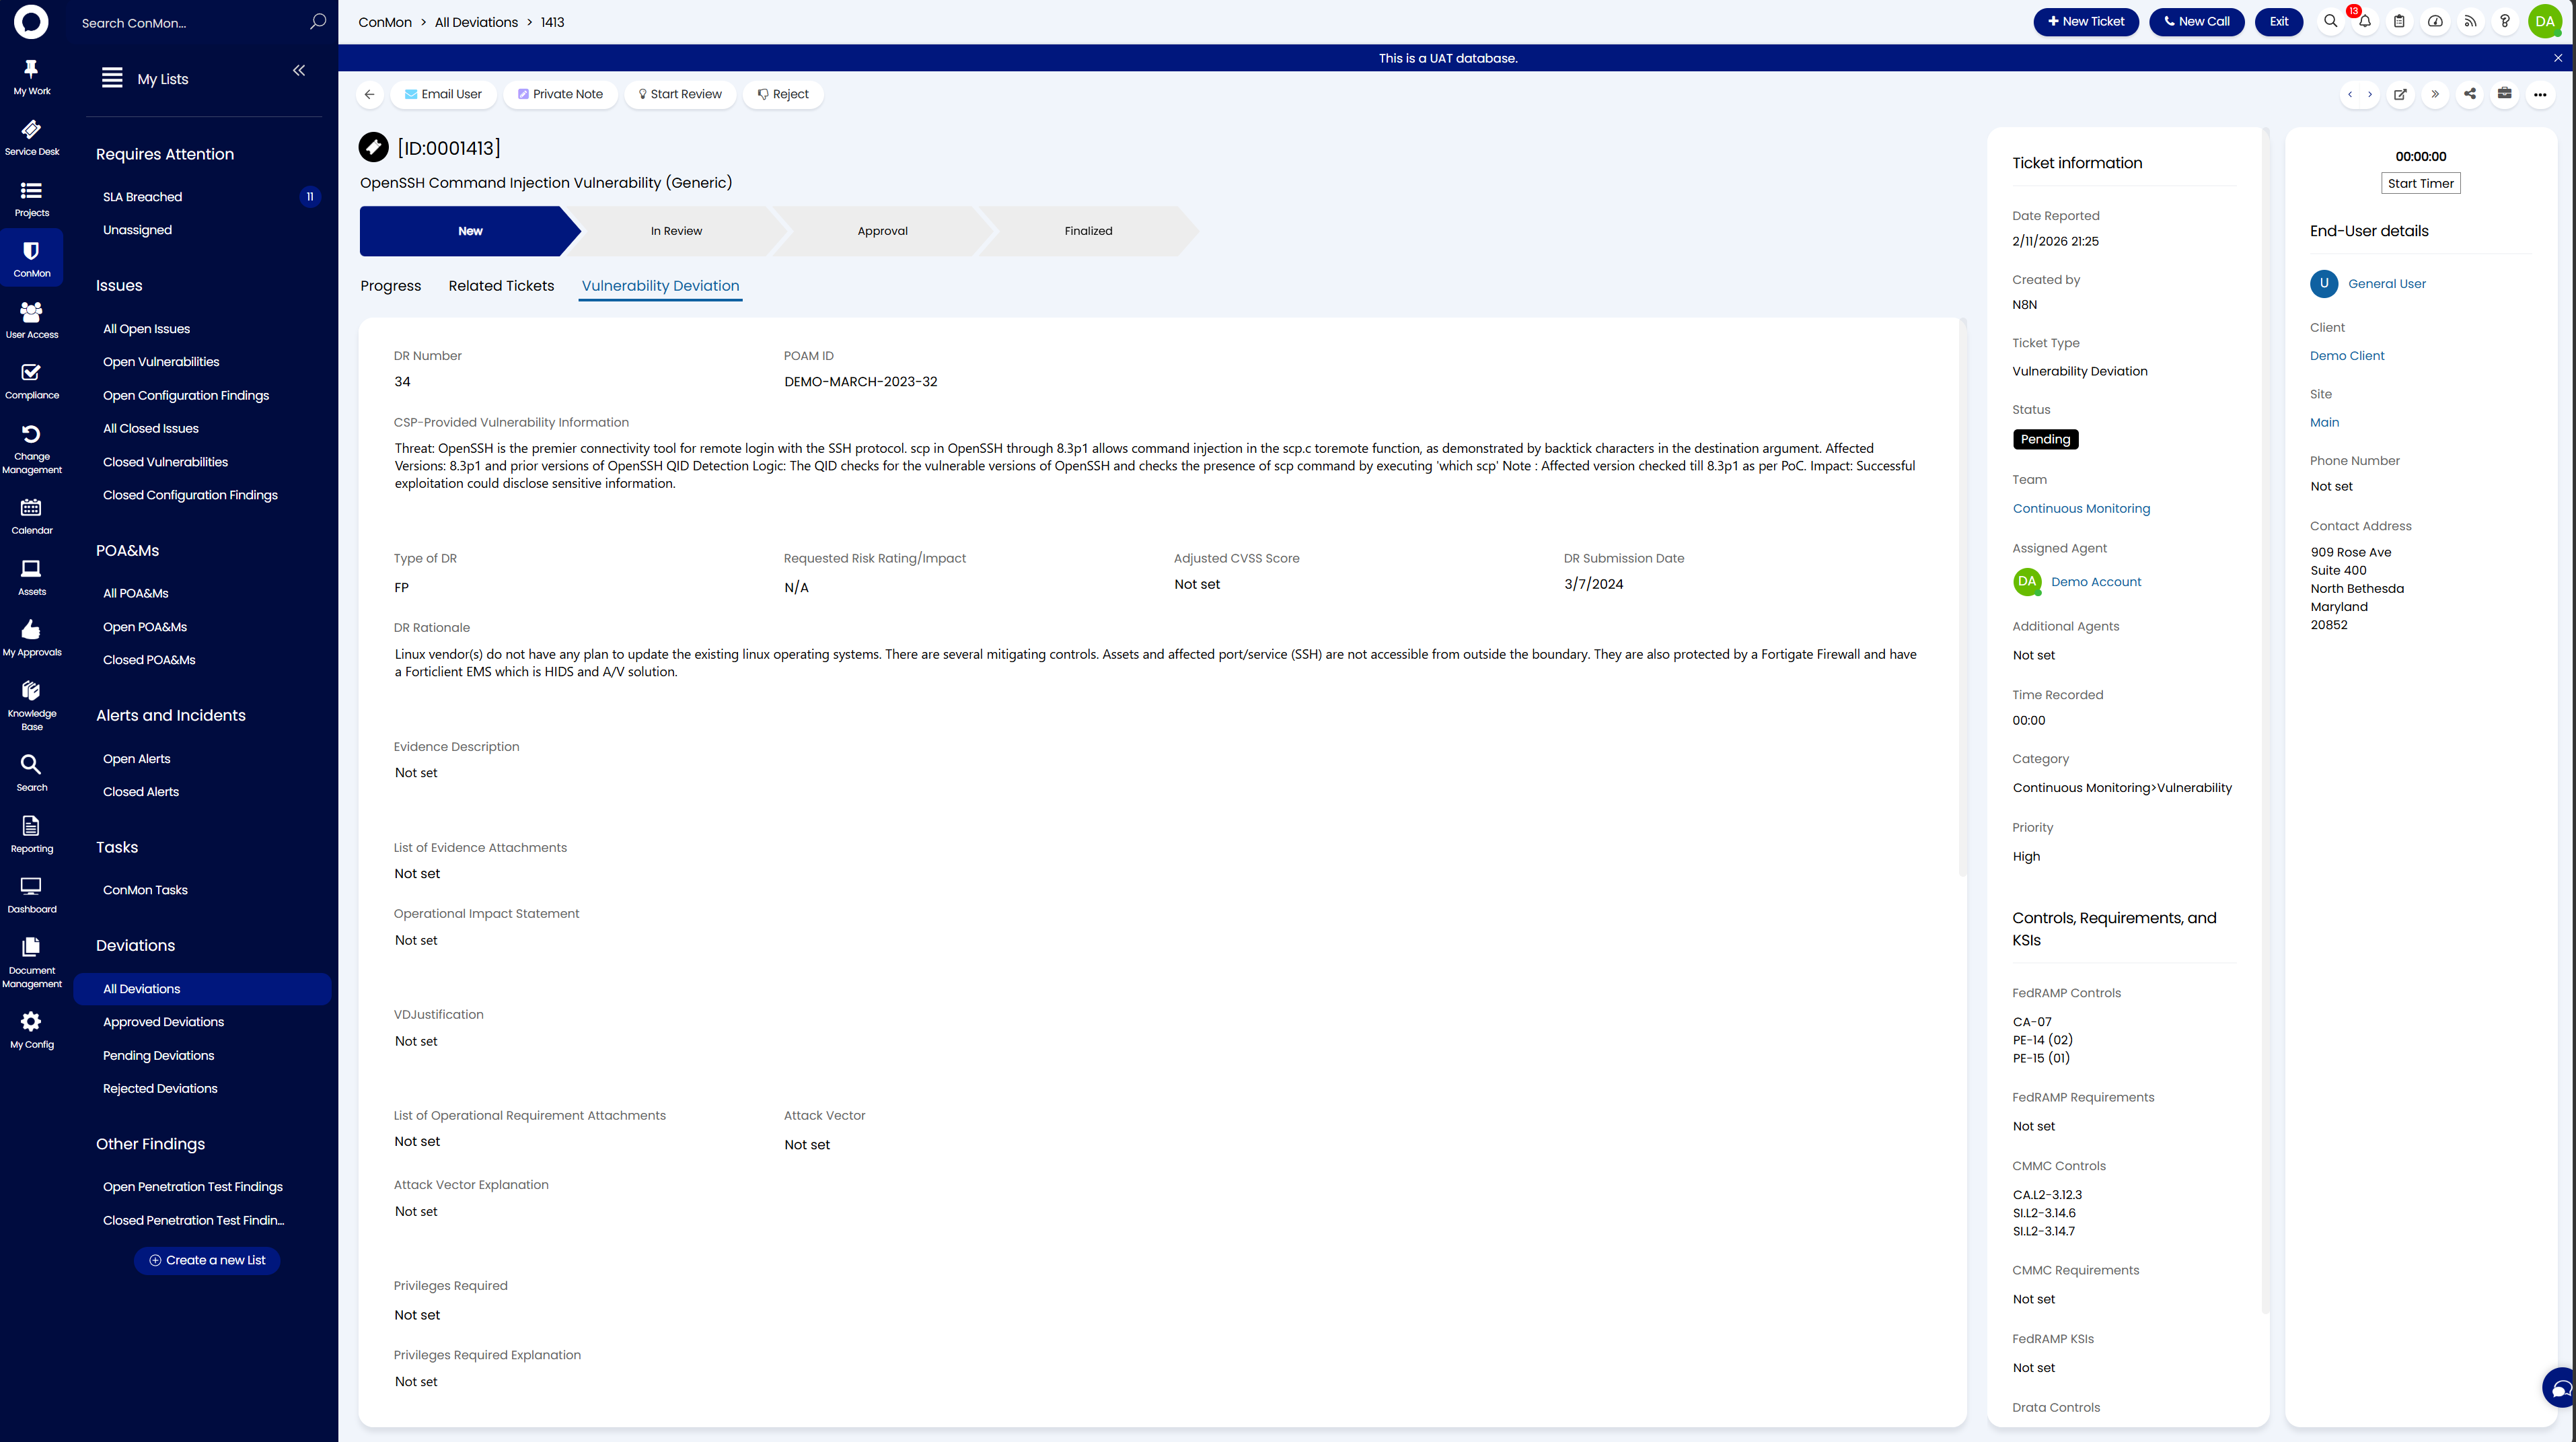
Step 2: Review the Deviation
Open the saved deviation and review it on the Vulnerability Deviation tab. Confirm the DR Number, POAM ID, Type of DR, CSP-Provided Vulnerability Information, and DR Rationale are all correct before proceeding.
Step 3: Link Issue Tickets to the Deviation
- Navigate back to ConMon > Issues > All Open Issues
-
Use the checkboxes on the left to select all findings that this deviation covers (you can select multiple tickets at once)

-
Click the Edit button in the top left to open the dropdown menu with bulk actions
-
Select Link from the menu
-
In the Link to another Ticket dialog, search for the deviation ticket you just created, select it, and click Confirm Selection
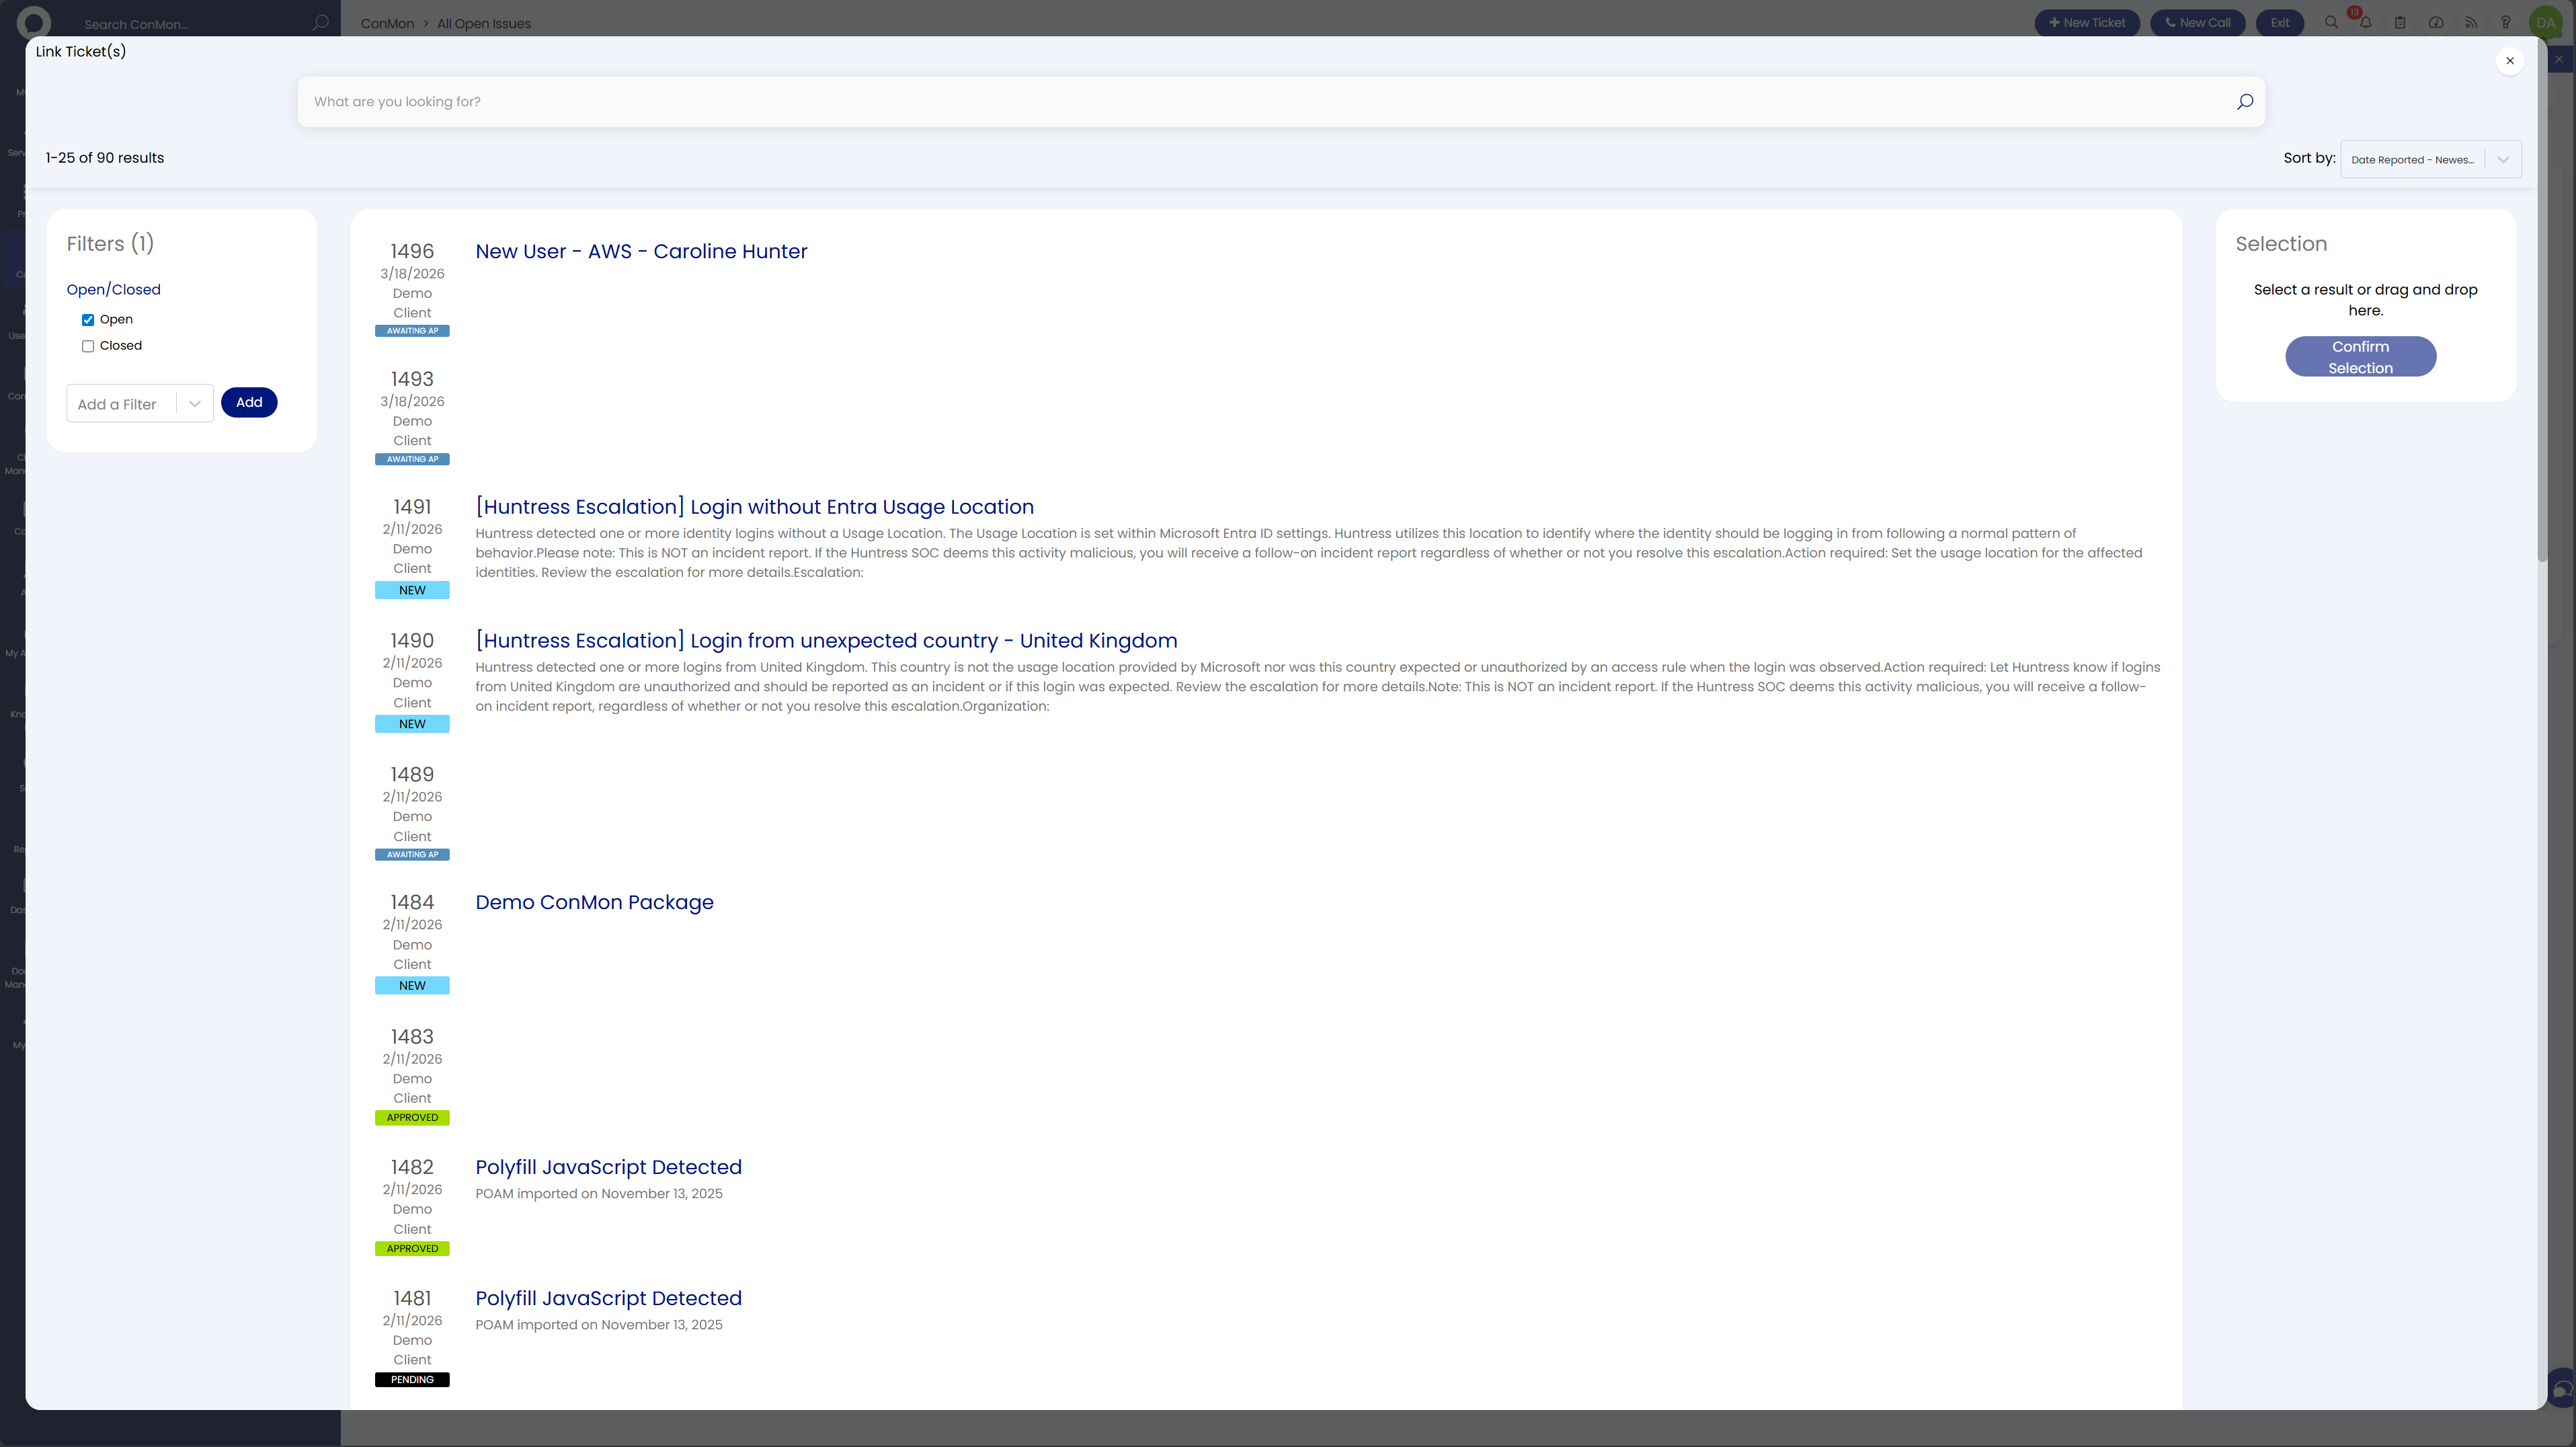
All selected findings are linked as child tickets under the deviation in one action, creating the audit trail.
Step 4: Request Deviation Approval
- Open the deviation ticket
- Click Request Deviation Approval in the toolbar
- Set the status to Awaiting Approval and add a note with the action "Request Deviation Approval"
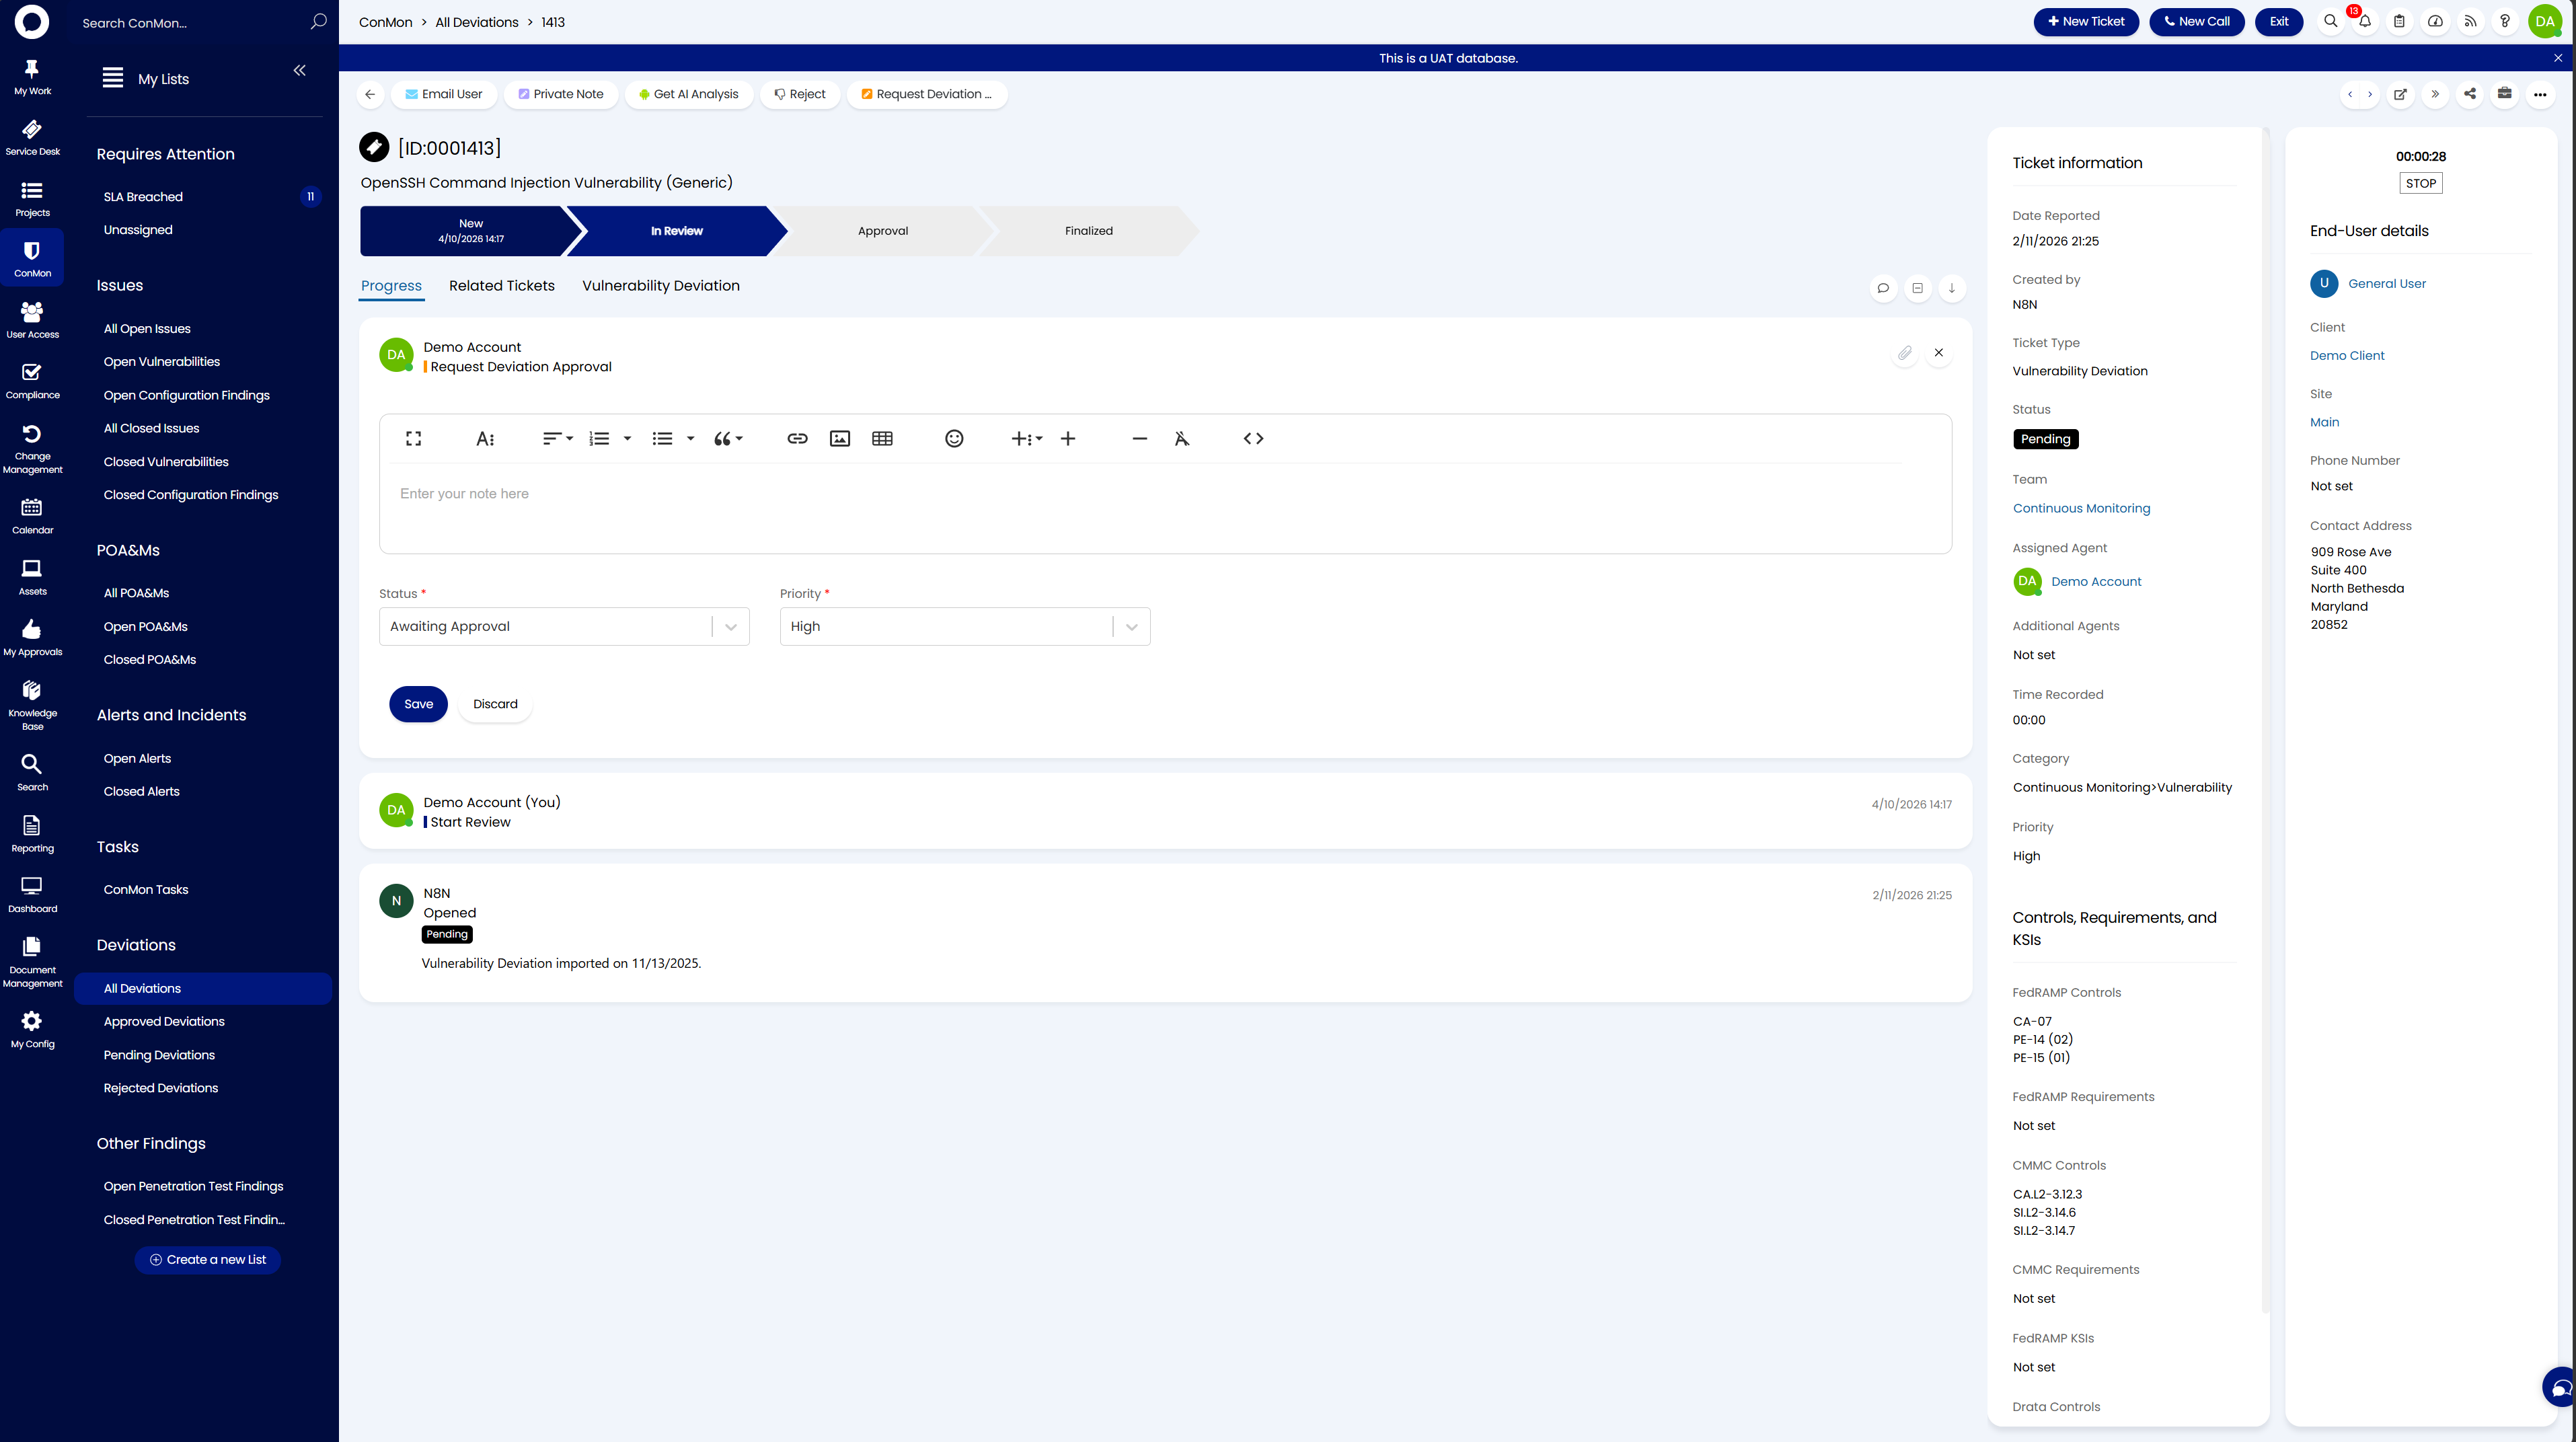
The deviation progresses through the workflow:
It will appear under Deviations > Pending Deviations until approved or rejected.
Escalating Real Issues
Any finding that is not a false positive must be escalated to the engineering team for remediation.
- Open the finding from All Open Issues
- Confirm the vulnerability applies to the organization's environment
- Note the severity, affected assets, and recommended remediation
- Escalate to engineering with:
- CVE identifier
- Affected device count
- Recommended fix
- SLA deadline
- Track remediation progress through ticket status updates
Overdue Findings
Findings that exceed their SLA appear as Overdue with a red negative SLA timer. These require immediate attention.
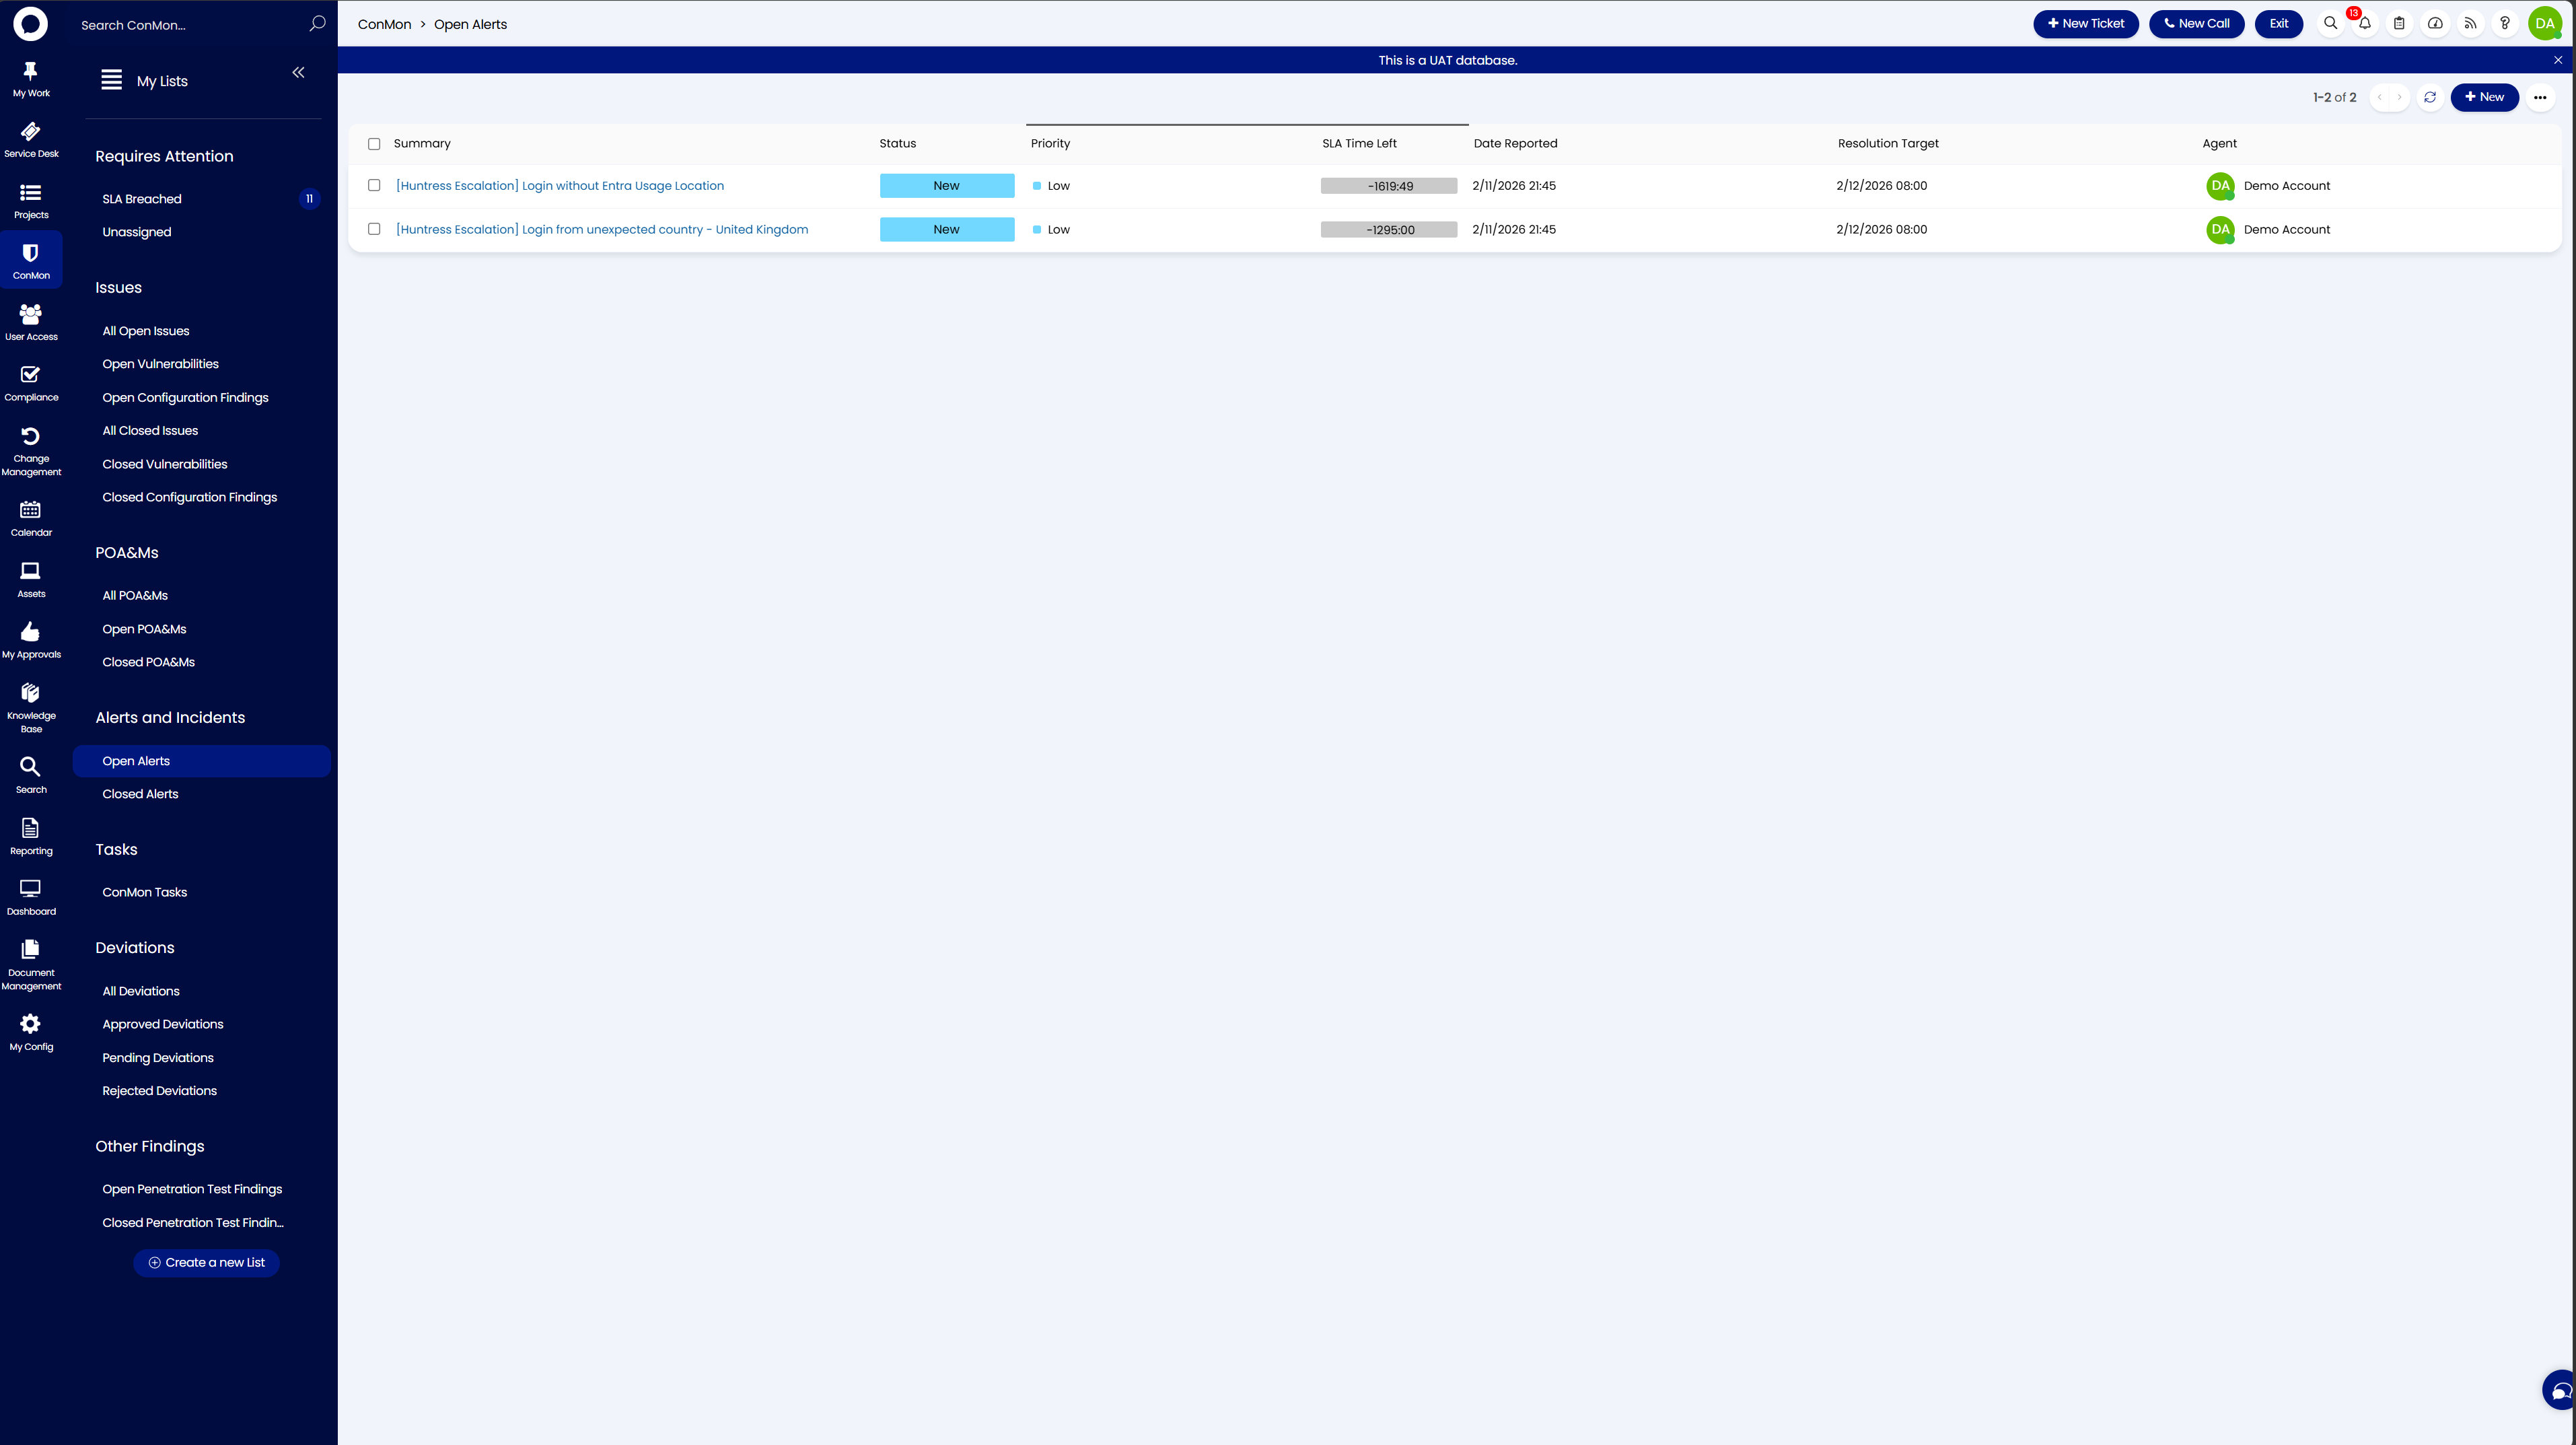
Alerts and Incident Response
Security alerts arrive in real time from integrated EDR, ITDR, and security tools, such as Huntress, Microsoft Defender for Endpoint, or other solutions depending on your environment. Navigate to ConMon > Alerts and Incidents > Open Alerts.
Common Alert Examples
The specific alerts you see will vary based on which security tools are integrated with your environment. Below are examples from common integrations:
Huntress (EDR / ITDR)
- Login without Entra Usage Location - An identity logged in without a configured usage location in Entra ID settings
- Login from unexpected country - A login from an unusual geographic location
- Unexpected VPN - Login through an unexpected VPN provider
- CRITICAL – ISOLATED - A critical threat detected and the endpoint was automatically isolated
Microsoft Defender for Endpoint
- Suspicious PowerShell command line - A potentially malicious PowerShell command was executed on an endpoint
- Impossible travel activity - A user account authenticated from two geographically distant locations within an improbable timeframe
- Malware detected and blocked - Defender identified and quarantined a known malware signature
Responding to Alerts
- Acknowledge - Update the alert status from New to In Progress
- Investigate - Review the login source, device, user account, and related activity. Look into the source of the alert in your EDR/ITDR console (e.g., Huntress, Defender, or other integrated tool) for additional context
- Determine - Is the activity legitimate (user traveling, authorized VPN) or malicious?
- Action - Legitimate: document and close. Suspicious/malicious: escalate immediately, follow IR plan, notify organizational POC
- Document - Record all actions in the ticket progress notes
Alert SLA Compliance
Alerts have tight SLA windows. The SLA Time Left column tracks compliance. Breached SLAs show red negative values and require immediate attention.
SLA Reference
Vulnerability Remediation
Vulnerability remediation timelines are based on the FedRAMP Continuous Monitoring Strategy Guide, which operationalizes the NIST SP 800-53 RA-5 (Vulnerability Scanning) and SI-2 (Flaw Remediation) controls by defining concrete remediation windows. These timelines have remained consistent across FedRAMP baseline revisions and are current as of FedRAMP Rev 5.
| Severity | Remediation Window | Description |
|---|---|---|
| Critical | 30 days | Actively exploitable or critical-impact vulnerabilities |
| High | 30 days | High-impact vulnerabilities with significant risk |
| Moderate | 90 days | Medium-impact vulnerabilities with limited exposure |
| Low | 180 days | Low-impact vulnerabilities with minimal risk |
Alerts
Alert SLAs are significantly tighter than vulnerability remediation SLAs and are configurable based on your organization's requirements. The defaults below follow incident response SLA timelines and can be adjusted to match your operational needs and contractual obligations.
| Severity | Response Time | Resolution Time |
|---|---|---|
| Critical | 30 minutes | 1 hour |
| High | 1 hour | 4 hours |
| Medium | 4 hours | 8 hours |
| Low | 8 hours | 24 hours |
Customizing Alert SLAs
These are the default alert SLA timelines configured in the platform. Your organization may adjust these based on your risk tolerance, compliance framework, or specific operational agreements.
Breached SLAs
When an SLA is breached:
- SLA Time Left turns red and shows a negative value
- The finding or alert may change to Overdue status